
Printing Processes

Last week in e-Comm we learned about printing processes. We watched videos to learn about the basics and then were asked to write a blog post to check out understanding. Then we started on trying out our own printing process called transfer printing.

We started by picking one or two of our favorite projects we have done this year in e-Comm. Then we filled our image and printed them out. The next day we watercolored two different papers to transfer our projects to. After everyone was done with watercolor and all our papers are dry we learned the next step in the printing process.

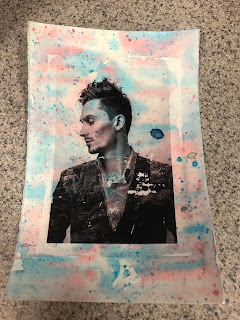
First we added mod podge to the back of our paper that we wanted to transfer to the watercolor. Then we used the squeegee to push out the air bubbles and extra mod podge. After that had dried we used water to rub off the paper and were left with our prints.

Overall I think this project was very fun ad not extremely hard but I still learned a lot. This has probably been my favorite project in graphic design so far this year.

Comments

Popular posts from this blog

Music Video

• Embed your work at the top of your blog post under your Title. These past few weeks in video we worked on recreating the Bet on It video from High School Musical 2. As a group we thought this video would be really fun to create and challenging in many ways. We also had a good idea for locations already so we thought it would be do able. We started with pre-production by dividing up the work to be efficient and effective because we wanted to have as much times as we could to film. We also decided Alex was going to act, Josh and Drew we going to mainly do the camera, and Maleah and I were going to help with choreography and making sure the video and our filming was the same and there wasn't anything weird going on. After we had footage we all edited together since we couldn't have everyone at the same time, so we had one person run editing and everyone else helping and we rotated the main editor. As a group I think we worked together really well and dealt with the issues w...

Sidewalk Chalk Art

         Over the past three days we worked as a group to create a symbol that represented us. The First day we were randomly assigned groups, once we were put into groups we were told to think of a symbol that represents our selves. The teachers taught us about ancient art and symbols. For example if you played soccer your cold do a soccer ball to represent you. then they said how colors can represent something to, like in a flag the colors could represent peace or war.        My groups members were Annabelle, Kate, and Andrew. Overall as a group we worked very well together. The first thing we did was work together to try to think of out symbols. Mine was a pointe shoe to represent dance, Annabelle's were pom poms to represent cheer, Kate' was a painting brush because she likes art, and Andrew's was a baseball and bat because he plays baseball. Then once we had our symbols we decided to put them in a code of arms.      ...

Making a Logo

The Process: Over the past few weeks we have been making are own logos. We started out by making sketches using our name. we made many different sketches then we narrowed it down to three. we then took those three logos and put them into adobe illustrator. Once in adobe illustrator we made different combinations of each logo. after we choose a final design in black and white we made different color combinations.    Why I choose this logo: I choose this logo because it was simple and complex at the same time. I liked the colors grey and back because the are neutral colors and could go well on anything The font I chose is very cute an happy for the Ava Clayton. The font I use fro the C was very simple and serious.